ClassesHow To’s
You Will Be Slip Casting Ceramics With These 5 Easy Steps
By Cathy Niland | 10.9.19
It is near impossible to make identical ceramics by hand. But with plaster molds, ceramicists can make endless duplicates of their work. Slip casting is often used for production pottery or replicating highly detailed pieces, but that doesn’t mean it’s not for the novice potter or sculptor. Slip casting is a great way to get more familiar with the properties of clay and build on existing ceramic experience.
Follow our five easy steps on how to slip cast your own ceramic multiples—a technique you can try yourself in Making Multiples: Slip Casting Ceramics, coming up October 23!
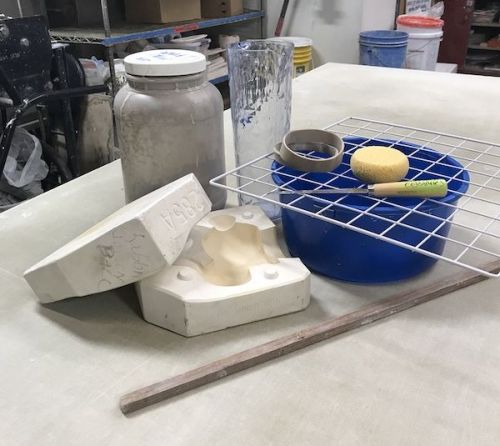
What You’ll Need For Slip Casting Ceramics
- Thick rubber bands
- Plaster mold
- Slip
- Pitcher (big enough to hold all slip needed to pour into mold)
- Stirrer
- Bucket or vessel (to catch excess slip)
- Dowels or grate
- Sponge
- Knife
Step 1: Prep your mold and slip


- Line up the two pieces of your mold and secure it using rubber bands. This will help prevent leaks.
- Turn the open reservoir upright and using your stirrer, thoroughly mix your slip until it is a creamy consistency.
- Pour slip into the pitcher. Make sure you have enough slip to fill your mold in one pour.
Step 2: Fill your mold with slip


- Slowly pour your slip into the opening of your mold until it reaches the top.
- Wait for 15-25 minutes to let your slip thicken.
- Pro-tip: The longer you wait, the thicker the walls of your piece will be. Not enough time and your walls will be too thin. Wait too long and your walls will be so thick they take a long time to dry.
- As the clay hardens, you will notice the slip sink into the mold. Continue to top it off with slip to ensure your design is fully formed.
- Pro-tip: If you are making multiple pieces in a row using the same mold, each casting will take longer to dry as the plaster mold becomes more saturated with slip. Be patient!
Step 3: Remove excess slip


- After 15-25 minutes, turn your mold over onto your rack or dowels and pour excess slip out into your bucket.
- Pro tip: Resist the temptation to turn your mold back over and look inside! This could send drips running back into your cast, creating uneven layers impacting dry time.
- Let your mold rest on the rack for another 20-40 minutes, depending on the thickness of the walls. This will allow your casting to become leather-hard.
- Check inside for a matte finish and/or gently touch the inside of your mold to check the wetness. Slip that has hardened enough will not have a sticky consistency. You might also see the casting pulling away from the wall of the mold just a little, indicating it is dry.
Step 4: Release your casting from the mold


- Once your casting is dry, remove the rubber bands and turn your mold on its side.
- Gently lift the top half of your mold off your casting. If the casting is dry enough it should come off with ease.
- Remove the casting from the mold. If there are small detailed elements that are a little stuck, you can loosen them using a pin or knife tool.
Step 5: Finish your piece!


